All About Hamantaschen

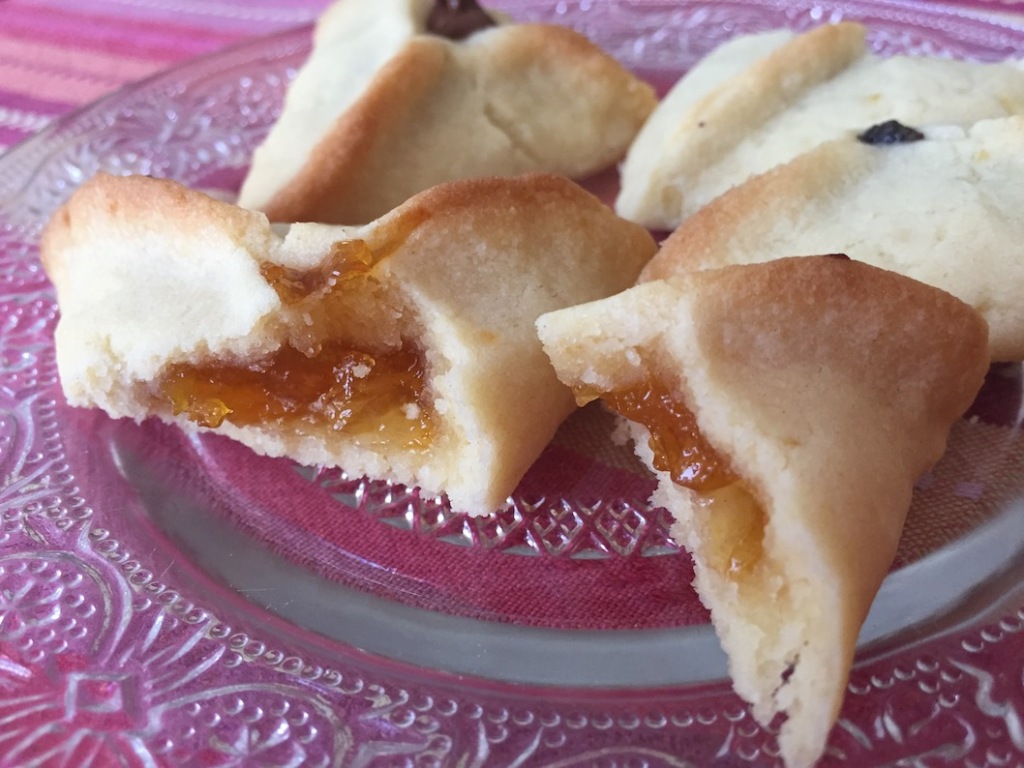
Haman taschen (in Yiddish and German) means Haman’s pockets. These are traditional Jewish, triangular shaped cookies, made for the holiday of Purim. In a nutshell, Purim is the Jewish equivalent to Halloween when it comes to costumes and partying. Is has been celebrated for centuries to commemorate the almost annihilation of the Jews in Persia, 2000 years ago, and their last-minute redemption thanks to Queen Esther, who happened to be Jewish, and her uncle Mordechai. The villain in the story who wanted to get rid of all the Jews and ended up being hanged, is Haman, the king’s chief advisor.

So, the cookies are named after Haman’s pockets. Why? I have no idea. In Hebrew the name is even funnier and translates as Haman’s ears. Again, I have no idea how the name came to be, but it seems like no one really wonders about it. Weird!

I don’t think I’ve ever bought Hamantaschen. We’ve always made them at home, for Purim, ever since I was a little girl. I loved making them with my mother and I love making them every year with my kids. This year even my hubby joined the fun. I know they enjoy it too, even though they are not little anymore. It is a fun tradition that we have in our home, and it makes the Purim holiday even more fun and special. One of the nice customs of this holiday is to make baskets of foods and treats and give them to friends, neighbors, and the needy. So, we always make a huge amount of Hamantaschen and add them to the baskets we make.

If you live in in the U.S, in areas where there is a large Jewish community, you may have seen these triangular cookies in delis, bakeries, and diners all year round. But I can promise you that they don’t taste anywhere near the following recipe. If you ever had Hamantaschen and thought you liked them, you must try this version. You’ll never be able to eat the other stuff again. And if you never had Hamantaschen, don’t look any further. This is the real deal. The dough in this recipe is different than the usual cookie dough you’ll find in most recipes. It is delicate and melts in your mouth and is soooo delicious!!
Enjoy!!

Ingredients:
100g powdered sugar
200g (8oz) cold butter, cut into cubes
350g (2 ½ cups) flour
¼ tsp salt
2 egg yolks
¼ cup milk
1tsp vanilla extract or lemon zest from 2 lemons (depends on the filling)

Preparation:
Place the flour, sugar, butter, and salt in a food processor equipped with the blade attachment and work it to get a crumbly mixture.

Add the egg yolks, milk, and the lemon zest, or the vanilla, and keep mixing by pulsing the mixture only to the point where the dough becomes cohesive.

If the dough is too sticky, add one tablespoon of flour. If too dry and crumbly, add 1 tbs milk. Do not overwork the dough, as you want it to be flaky.

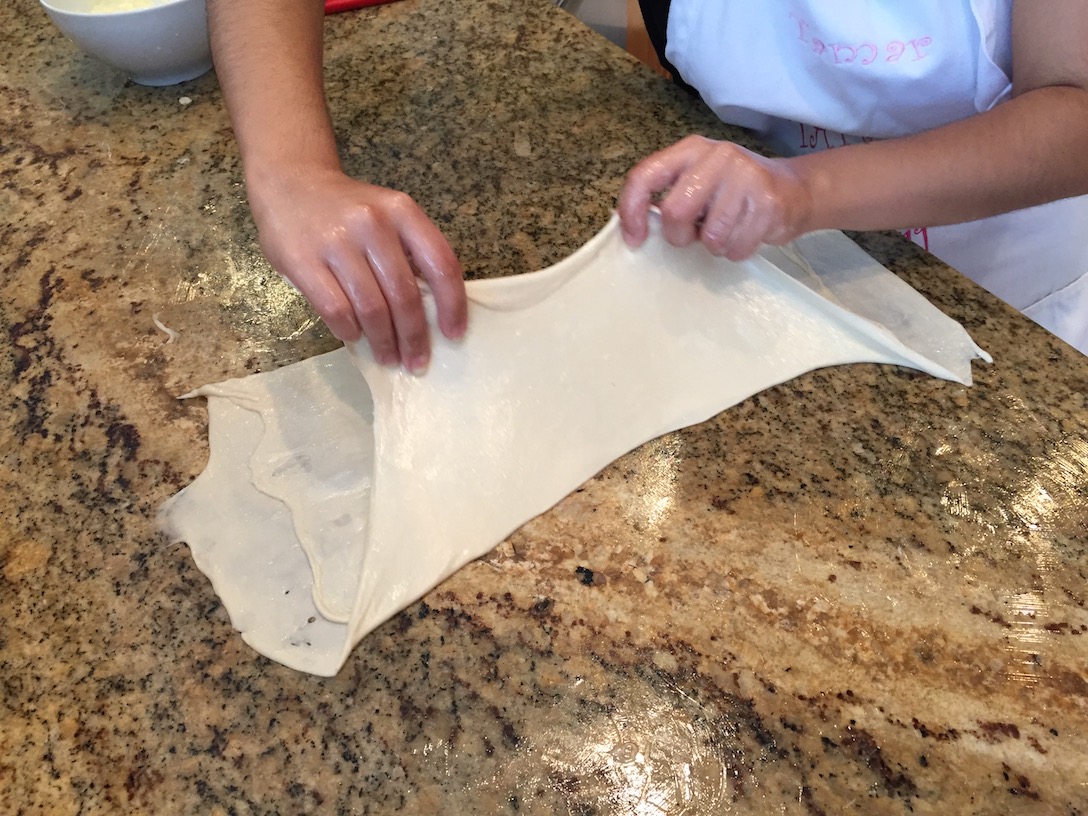
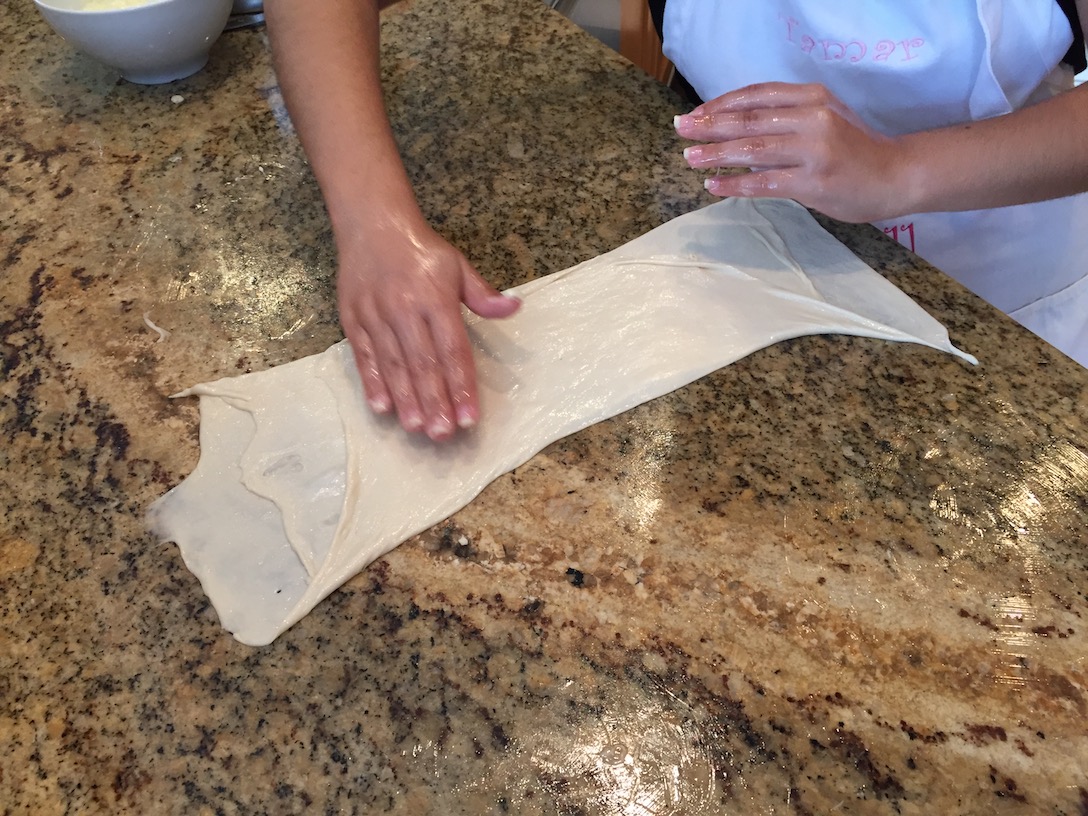
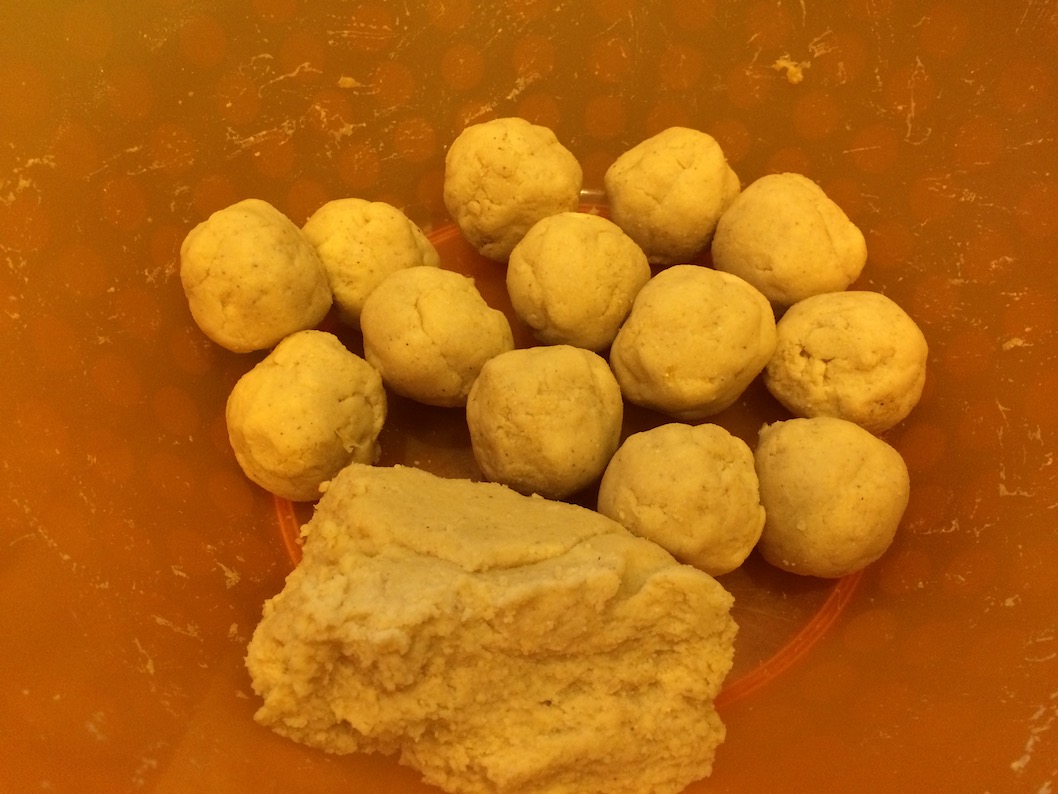
Flatten the dough into a 2-inch-thick disk, to make it easier to open it later on. Wrap the disk in plastic wrap and keep in the fridge for a couple of hours.

In the meantime, prepare the filling of your choice. Some suggestions are given on the bottom.

Preheat the oven to 350F. Remove the dough from the fridge and bring to room temperature so you can easily roll it out, without cracking the dough. Roll out the dough to 1/8 inch in thickness. Use a 3 ½ inch wide drinking glass or a round cookie cutter to cut round disks. Try to leave as little room as possible between disks, to avoid reusing much of the dough. The less you work the dough, the flakier the cookies will be.

Spoon 1-2 teaspoons of your filling of choice into the middle of each disk. Fold up the edges of the disk to form a triangle. Pinch the corners to “glue” them together. You may leave some the cookie open so the filling is visible, or you can choice to pinch the edges completely and create a “surprise” cookie.

Place the Hamantaschen, 2 inches apart, on a baking sheet covered with parchment paper, and bake for 12 minutes. The cookies should remain light colored. They are not supposed to brown too much.

There are some traditional Hamantaschen fillings used commercially such as prune, apricot or raspberry jelly, and sometimes poppy seeds. Chocolate filling is a newer addition in commercial Hamantaschen in Israel. However, the fillings are usually of the less good quality.

Best thing would be to make your own filling. You can fill your Hamantaschen with every filling you can think of. Here are some of our favorites:

Cocoa, chocolate Chips, and Cinnamon (use vanilla in the dough and omit the lemon zest)–
1 stick very soft butter
3 hipping tbs cocoa powder
1 hipping tbs cinnamon
5 heaping tbs sugar
1 cup chocolate chips
Mix the butter, cocoa powder, cinnamon, and sugar, into a paste. Place ½ tsp of the paste in the middle of each dough disc, then top with 4-5 chocolate chips.
You may also try to just fill the dough with some chocolate chips. It is less rich and gooey, but still yummy. Another option is to fill the Hamantaschen with Nutella. It is not my cup of tea, but my kids love it.

Poppy Seed, my number 1 choice (use lemon zest and vanilla in the dough)-
¼ cup milk
2 tbs honey
¾ cup sugar
2 cups ground poppy seeds
Zest from 2 lemons
Combine sugar, honey and milk in a medium sauce pan and simmer on low heat, until sugar is completely dissolved. Add the poppy seeds and keep simmering for 3-5 minutes, occasionally stirring the mixture. Remove from the heat, stir in the lemon zest, and set aside to cool.

Dates, pretty up there with the poppy seed (use lemon zest in the dough and omit the vanilla) –
200g (8oz) soft Madjool dates, pitted
50g (2oz) soft butter
Place dates and butter in a food processor and pulse into a paste.

Apricot preserves (use lemon zest and vanilla in the dough) – The difference between preserves and jelly is the texture. Jelly only has the fruit juice in it and is very smooth. Preserves have pieces of the actual fruit and are a little chunky. For our purpose, preserves are better since they hold better and are less runny when baked. Buy the best quality preserves you can put your hands on, do not compromise. It does make a difference. If you only find jelly, do not buy the fake one used in commercial Hamantaschen. Get the good stuff, with no additives or preservatives. To make it hold better when baked, mix the jelly with some tea biscuits crumbs.

Jachnoon

Breakfast as we know it, takes a different turn on Saturday, for traditional Jews. Shabbat breakfast is almost always food that was cooked overnight in the oven or on low heat on the stove. Or it was entirely cooked before Shabbat and warmed up in the oven that is on all day. Nothing is freshly cooked. Not that it matters much. Most Shabbat breakfasts I’m familiar with are so yummy and special, that it makes me look forward to Shabbat, just to be able to enjoy these dishes.

Jachnoon is of a Jewish Yemenite origin, and was brought to Israel by Yemenite immigrants. It is a baked rolled dough with honey and butter. Being so well integrated into Israeli homes, Jachnoon is now considered an Israeli dish.

Jachnoon pot is a simple tin pot with no handles and a tight lid that wraps around the top of the pot. In the U.S you may find it in some Israeli/kosher stores. However, any ovenproof pot with a lid, about 2.5 quarts in size, is good.

1kg (2 ¼lb) all-purpose white flour
120g (5oz) honey
4 tsp salt
3 cups water
½ cup oil
200g (8oz) very soft butter

In a mixer bowl, mix flour, honey, and salt, using a spoon. Add two cups water, give another stir with the spoon, then mix for about 3 minutes, using the hook attachment, to form a smooth, soft dough. The dough should not be firm, it should sag. If the dough is dry or stiff, add another ½ – 1 cup water.

Cover a large tray with oil. Divide the dough into 12 pieces by pulling dough the size of a small apple (with oiled hands) and pinching it off the large dough mass, one piece at a time. Knead each piece in your hands into a ball, then place it on the oiled tray after rolling the ball in the oil. You may need more than one tray to accommodate all the balls. Cover the dough with plastic wrap and let them rest for 30 minutes.

Jachnoun balls resting

Generously butter a work surface. Place one of the dough balls on the buttered surface. Use a rolling pin to roll out the dough, then keep spreading it outward using your hands, and open it to form a paper-thin, round shape. Using your hand, spread about one tablespoon very soft butter on the stretched dough.

Fold the right side of the dough to the middle, then fold the left side on top of the right one (like an envelope). Do not worry if you have some holes in the dough. You will end up with a long strip of folded dough. Butter the top of the strip.

Starting at the bottom, roll the strip of dough upwards while slightly pulling the edges outwards.

Place the rolled dough on the bottom of the pot adjacent to the wall. Repeat the process with the other balls and arrange them close to one another in one layer in the pot. When the first layer is full, cover it with parchment paper and create a second layer on top.

Optional: If you have room left in the pot after placing in all the rolls, you can add eggs. Wrap about 5-6 eggs in tinfoil. Cover the Jachnoon with parchment paper, then place the wrapped eggs on top. Cover the pot with the lid. No room left in the pot for the eggs? No worries. Place the tinfoil wrapped eggs on the oven wire next to the Jachnoon pot. Just make sure the eggs are well sealed in the tinfoil, to avoid steam from escaping.

Preheat oven to 220F. Place in the Jachnoon pot and the eggs in the oven before you go to bed and bake overnight (10-12 hours).

Jachnoun ready

Serve it the following day for brunch, with a nicely browned egg, grated fresh tomato salted, and spicy z’houg.

For the Jachnoon to taste best, eat it with your hands!!!

Jachnoun served

How to Grill Eggplants and Bell Peppers

Eggplants and bell peppers are very popular vegetables in Middle Eastern and Mediterranean cuisines. They can be either fried or grilled first and then used in main dishes as well as appetizers.

The best way to grill eggplants and peppers to get the most flavor, is to grill them on open fire, either on a grill, or over a burner of a gas stove. However, as easy as it sounds (and it really is), not many people I know in the U.S. know how to do it right, let alone do it at all.

So for all of you who would like to try this grilling technique, here’s how you do it:

On the grill –

Set your grill to high heat.

Pierce the eggplants in several spots, using a sharp knife. That will allow steam to come out of the eggplant when grilling and will prevent the eggplant from exploding on the grill.

Place the eggplants on the grill, no need to wait for the grill to be hot.

When the bottom of the eggplant is nicely charred, turn it a notch, using tongs, and grill until charred. Keep turning the eggplant until all sides are well charred.

Place the eggplant up-side down in a strainer over a bowl and cut the tip slightly to let all the liquid out. Leave to cool.

Place the peppers on the grill, no need to wait for the grill to heat. When bottom side of peppers is burned, turn them a notch, and grill until burned. Repeat this step until peppers are burned on all sided, including the top. Remove from the grill, using tongs, and place in a pot covered with a lid. Leave all the peppers covered in the pot for 30 minutes. The steam created in the pot will make the skin separate from the flesh and peel off easily.

On the stove –

Turn the stove burner to medium.

Place the eggplant or pepper on the burner grate directly above the burner. When the bottom is charred, turn slightly until all sides are well charred.

Remove from the burner and continue as specified above.

Both the eggplants and peppers can be used chopped or pureed to make different salads and spreads, mostly of the Mediterranean, Balkan, Middle Eastern type. They can also be used as an ingredient in some other dish.

Preserved Lemons

Recently I’ve been in the mood for everything sour, starting with tart fruit, lemony dishes and desserts, and ending with different kinds of pickles that I devour straight from the jar. And no, I’m not pregnant. If anything, it may have to do with some pre-menopause weirdness. So as part of this crave, I had to make these preserved lemons that I love sooo much. I’m not sure if the recipe originates in Morocco or Tunisia, but I know it is very well loved in both countries, and is a favorite condiment in Israel, where I come from.

These preserved lemons are served as a condiment with meat and fish, in sandwiches, and in salads. You can also use them in cooking. One of the ways I like to use it is in Moroccan Carrot Salad.

lemon ingredients

Ingredients:
8-9 lemons (about 2lb) rinsed well
4 tbs salt
4 cloves garlic, sliced
Pepper flakes
Sweet paprika
Olive oil

Preparation:
Cut 2 lemons into quarters lengthwise, then slice each quarter into ¼ inch slices. If the lemons have many seeds in them, cut the white film on at the top of the wedge that connects all the membranes, as shown in the picture. This opens the membranes so you can easily remove the seeds.

Place the lemon slices in a pickling jar and press them down using your fist.
Sprinkle on top 1 tbs of salt, 1 sliced clove of garlic, a tiny pinch of pepper flakes, and a small pinch of the paprika.

Repeat the process with the remaining lemons, pressing every two lemons down with your fist and topping them with the spices. Fill the whole jar and make sure the lemons are well pressed. If needed, add more lemons until jar is full.

When the jar is full, top the whole thing with a little bit of olive oil to cover the lemons and ‘seal’ them. This will prevent the lemons from going bad.

Seal the jar with the lid and refrigerate. The lemons will be ready to eat in three days, and will last for up to a month refrigerated.

lemon closed

Homemade Corn Tortillas

When we go out to eat, we’re always on the look-out for small Mom and Pop, hole-in-the-wall places where the food is authentic and usually of a much better quality than the big chains. However, unfortunately for us, although we may very much enjoy the meal, we can’t stop thinking that we could easily make some of the dishes at home and they would taste just as good. And when we try at home, and the dish actually comes out the way we like them, we don’t feel the need to eat out anymore (unless I don’t feel like working). Sometimes it feels like shooting myself in the foot…

When it comes to Mexican food, which we all love, there are some staples that we’ve already mastered at home, such as guacamole, salsa, and pico de gallo, and our own bean, fish, and meat fillings for tacos. Thank God there is so much more to Mexican food than just tacos. It gives us a reason to leave the house and enjoy other dishes that we don’t make at home. Until recently, the only obstacle to having our own perfect taco dinner at home were good corn tortillas. All the store-bought corn tortillas I’ve tried aren’t as good as the tortillas you get at decent Mexican restaurants. So I decided to try and make corn tortillas at home.

I prepared in advance for making tortillas at home and picked a day when I wasn’t super busy, thinking it would be a big project. But it wasn’t. I used Bob’s Red Mill masa harina, and followed the recipe on the back of the bag. It was so easy to make and we enjoyed it so much, that I have decided to make it more often.

I made a double batch, planning on freezing or refrigerating some of the tortillas for another time, but before I knew it, they were all gone. Even my youngest son, who would not touch store bought tortillas, had three of them and asked for more. Success!

Just a side note – when I tried to make tortillas again, I bought masa harina at a Mexican grocery, thinking that it would probably taste better than Bob’s Red Mill. I was wrong. Not only didn’t it taste better, but also it was stickier and harder to work with. So I’m back to Bob’s Red Mill. The recipe here works for this flour. If you buy masa harina of a different brand, follow the instructions on the package instead, for best results.

Corn Tortillas – makes 12 tortillas

Ingredients:
2 cups Golden Masa Harina Corn Flour
1/2 tsp Sea Salt
1-1/2 to 2 cups Hot Water

Preparation:
Mix salt into the masa harina corn flour. Slowly pour the water into the dough to get a good consistency. The dough should be firm and springy when touched, not dry or sticky. Let rest for about an hour, covered.

tortilla balls

Preheat a griddle or a cast iron pan. Divide the dough into 2 inch balls.

Press each dough ball between two pieces of waxed paper. You can either use a tortilla press, or if you do not have one, use a heavy skillet or a heavy dish instead. Just make sure that your ball of dough is placed between two pieces of wax paper so that it doesn’t stick to the dish or the work surface.

tortilla flattening

Place the flattened dough on a hot griddle or in a heavy pan, and cook until the top of the tortilla starts to look cooked, about 30-45 seconds. Flip to the other side and heat for a few seconds.

tortilla cooking
tortilla pile

Pile the tortillas on a plate, and cover with a towel. Serve them warm with your favorite variety of fillings such as grilled fish, sautéed ground beef, refried beans, guacamole, pico de gallo, etc. Corn tortillas tend to dry very quickly, so you should eat them while they are still fresh and warm, or place them in a sealed bag and freeze.

Pickled Treasure

What do you do when you are left with some debris like broccoli stems, cauliflower core and leaves, or cabbage core? Throw it in the garbage, you say? Wrong answer. The answer is turn this trash to treasure. Never throw away food. There is always something better and useful to do with it.

pickles debris

In this case, I’ll show you how to make pickles out of all these debris.
First you have to rinse well all stems and leaves, and cut off the bottoms of the stems.
Using a coring knife or a peeler, peel the broccoli stems to discard of the tough outer layer.

pickles stems peeled

Slice all broccoli and cauliflower stems into very thin rings. Using a food processor to do the job can save you time and effort. I also added a few peeled carrots in to add color and volume.

pickles sliced

As for the cauliflower leaves, slice them into thin strips, using a knife.

pickles sliced too

Get a glass jar and start filling it with the sliced veggies, about 2-3 inches high. Cut one or two lemons into quarters lengthwise, then slice each quarter into thin slices.Top the veggie layer in the jar with a single layer of lemon slices. Repeat the same process until the jar is full.

pickles layered

Every once in awhile push the vegetables down with your fist, so the veggies are tight and cozy.

pickles fist down

Next step is to make the brine. In a measuring cup, measure 2 cups of water. Add to it 2 teaspoons salt and stir until the salt is completely dissolved in the water. Pour the brine over the veggies to fill the jar almost all the way (leave about ½ inch from the top). Close the jar with lid, give it a quick shake and leave on the countertop for 3-4 days to ferment and become pickles.

Optional: for the brine, you may substitute ½ cup water with ½ cup cider vinegar.

pickles in jar