Vegan “Feta Cheese”

I was very skeptical about vegan cheeses that try to mimic real cheese. I’ve tried a few of them and wasn’t at all impressed, to the point where I decided it wasn’t worth the effort looking for substitutes. I just needed to learn to live without cheese. It was all good until I came across this “feta cheese” recipe in an Israeli vegan blog. Feta cheese was one the things I most regretted not eating anymore since becoming vegan. I LOVE feta cheese. So when I came across this recipe I had to give it a try. And I was pleasantly surprised. It is delicious!! Is it feta cheese? No. But it tastes and feels like cheese and it is salty and tangy enough to satisfy my craving for feta cheese.

So without further ado, here is the recipe. If you are a vegan who happens to love feta cheese, this may hit the spot.

Ingredients:
1 ½ cups (145g) almond flour
45g raw cashew nuts soaked in water for 5 hours
¼ cup lemon juice
½ cup water
3 tbs extra virgin olive oil
2 cloves garlic
1 ¼ tsp salt

Preparation:
Place all the ingredients in a food processor and process to a smooth puree.

Place a colander in a slightly bigger bowl and drape a cheese cloth over the colander. Pour the puree into the cheese cloth. Tie the corners of the cheese cloth together to make a sack, and suspend over a bowl for 12 hours or overnight in the fridge.

Preheat an oven to 350F.
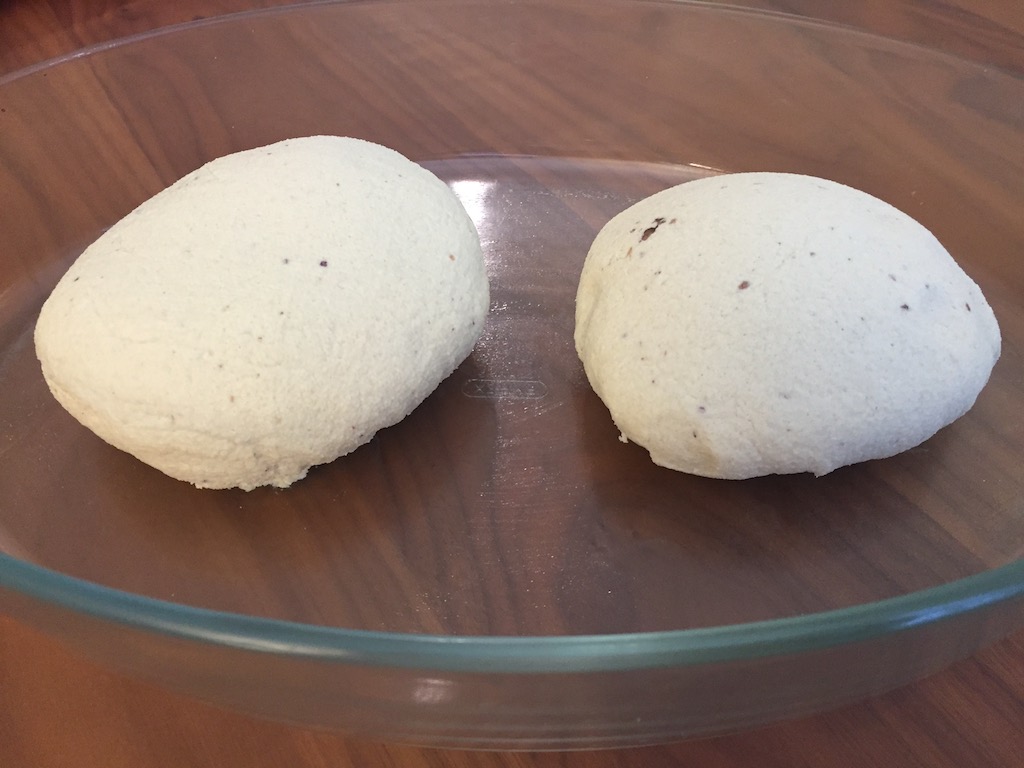
Grease a baking dish with a tiny bit of oil, then untie the cheese cloth and gently place the ball of cheese in the baking dish, face down.

Bake for about 40 minutes, until the cheese becomes golden. Remove from the oven and let cool completely.

Keep refrigerated up to 3 weeks, if it lasts that long…

We like to use it as a spread or crumble it over a salad or any other dish.

It is really surprisingly delicious!

Middle Eastern Herb Omelet

If you are following my blog, you may have already noticed by now that herbs and greens are used abundantly in Persian cuisine, and in addition to being cooked, they are also consumed raw as accompaniment to cooked food.

One very simple dish that is unbelievably delicious is khagineh, or herb omelet, which is eaten as part of a light meal, and is traditionally served with good rustic bread or pita, yogurt and fresh vegetables.

Iraqi and Kurdish Jews in Israel also make this herb omelet, known in Kurdish, Iraqi, and Arabic by the name of Idjeh. In Israel you can come across this omelet served in a pita in some of the street food eateries, usually served with tahini, tomato, and pickles. Yum!!

In addition to making herb omelet at home every once in a while, it became one of the dishes we always make on Passover. It was traditionally eaten in my family during Passover and my mother loved using a wet matzah to make a sandwich roll with the omelet. So that’s how I eat it.

Ingredients:
1/3 cup oil
1 medium onion, diced
4 cups chopped fresh herbs of choice (green onions, parsley cilantro, basil. dill, mint, etc.)
8 eggs
Salt and pepper

Preparation:
Heat the oil in a large pan. Add the onion and sauté until golden.

Add the chopped herbs and sauté for 5 minutes.

In a bowl, whisk the eggs with salt and pepper. Pour the eggs on the sautéed herbs, cover the pan with a lid and cook for 2-3 minutes.

Remove the lid, place a large tray over the pan and turn the pan upside down to transfer the omelet to the tray. Place the pan back on the stove and slide the omelet back. Cook for 1-2 more minutes and transfer to the serving tray.

My Dad’s Very Yummy Veggie Delight

Raw diet is a big trend in the U.S, but my parents are not from here. They haven’t heard of veggie shakes and raw food diet. Yet, they eat very healthy. For the last 30 years (at least), they have been having a large bowl of vegetable salad, made fresh by my mother, as their dinner every night.

My dad, with a stroke of genius, came up one day with this amazing pureed vegetable salad that makes you want to eat raw vegetables three meals a day. It immediately became a staple dish in my parents’ home, although not instead of the traditional salad. This shake has become one of our favorite breakfasts.

Whether you are into health food or not, this is a wonderful and a very yummy way to eat your veggies. This is not a shake, so don’t expect it to be smooth or liquid. You eat it in a bowl with a spoon.

We like to wash and chop enough veggies for 3-4 days at a time. We divide them into daily portions, so every morning we blend the contents of one bag for breakfast (enough for 2-3 people). It saves us time in the morning and we also don’t end up not eating the veggies just because we get lazy preparing them. The things we add fresh at the last minute are the avocado, lemon juice, oil and spices. The amounts given below are a daily portion ( for 2-3 people).

1 large tomato
1 small cucumber or ½ large cucumber
½ red bell pepper
1 medium carrot
¼ of a small onion
½ bunch cilantro (1 packed cup)
½ bunch flat parsley, leaves only (1 packed cup)
½ packed cup fresh mint leaves
1 piece of fresh ginger, peeled (about 1 inch in diameter)
¼ avocado
2 tablespoons extra virgin olive oil or cold pressed flaxseed oil
Freshly squeezed lemon juice from 1 lemon
Salt to taste

Cut the tomato, cucumber, pepper, carrot and onion to large pieces and place in a food processor.

Add the rest of the ingredients and process until veggies are all well pureed. The consistency should be of a somewhat thick soup. If the mixture is too thick, add a little bit of water and pulse it a little longer.

The puree is best eaten fresh, but can also be refrigerated for up to one day. After that, it loses its wonderful fresh flavors and probably some of the nutrients as well.

Spiced Apple and Orange Bread Pudding

A few days ago, I discovered a forgotten raisin challah deep in my freezer. I looked at it and thought that it could be really good for bread pudding because of the raisins. I don’t usually make bread pudding at home. Not that I don’t like it, but it is not one of these dishes that come to mind when I have leftover bread. We usually use the leftover challah (if we even have anything left) to make French toast or grilled cheese sandwiches.

This time, it was destined to become bread pudding. I looked up some recipes for general guidance, and then I looked in my fridge to see what I wanted to add. I found an orange that had been there forever and needed to be redeemed and a couple of apples that I thought would add some nice autumnal flavor. I also added some spices, to make it interesting. Eventually, I collected more ingredients than I actually ended up using (the butter in the pics never made it in the pudding). I guess my recipe can be considered a leftover dish since I used, in addition to the old challah, an orange that had seen better times, and 3 egg whites that were left over from eggs used for another dish. However you look at it, I think I winged something that came out pretty good, and I hope you like it, too.

Ingredients:
1 raisin challah bread, cubed
2 apples, peeled and shredded
1 orange, zested and juiced
½ cup sugar
½ tsp ground cinnamon
½ tsp ground nutmeg
¼ tsp ground clove
¼ tsb ground cardamom
3 egg whites
2 eggs
1 cup milk
1 cup heavy cream
1 tbs butter, for greasing

Preparation:
In a large bowl, combine the cubed challah, shredded apples, zest from the orange, sugar, and spices.

In a separate bowl, mix the eggs with the milk, heavy cream, and orange juice (including the pulp).

Pour the liquid mixture into the bowl with the dry ingredients and, using your hands, mix it all well but gently, to make sure the spices and the orange zest are spread evenly.

Generously grease a 13 x 9 ovenproof baking dish with butter, then pour the contents of the bowl into the baking dish, and spread evenly.

While the bread is soaking the liquids, turn on the oven to 350F.

When the oven is ready, put in the bread pudding and bake for 30 minutes.

Enjoy the smells that come out of the oven!!! And later on the flavors, too!

The pudding can be served warm or at room temperature.

Unorthodox Homemade Preserves Making

My way of making jelly, or more accurately, preserves, does not entirely follow conventional jelly making, as you may find online or in books. I follow my grandmother and my mother’s methods. So far, it worked out for me. So what do I do?

Ingredients: with most fruit I only use two ingredients: fruit and sugar. No pectin, no citric acid and no other flavorings. Sometimes I add 2-3 tablespoons of lemon juice if the fruit in question lacks tartness.
There are some preserves though, such as quince, rose petals, eggplant and other out of the ordinary jellies and chutneys, that require additional ingredients like water or spices. But for most fruits, adding only sugar does the work.

Quantities:  I do not use exact measurements. I cook by eye. Generally, my fruit to sugar ratio is about 3:1, sometimes 4:1, depends on the sweetness of the fruit. I love my preserves not too sweet and with a hint of tartness.

Cooking: I cut the fruit into 1 inch pieces, place in the pot, and cook on medium-low heat. I pour the sugar on top of the fruit without mixing it in. The fruit needs to cook slightly and start extracting some juice before sugar gets to the bottom of the pot. If you have sugar on the bottom while the bottom is still dry, you risk burning the sugar. Once there is enough liquid in the pot (about 1 inch), I stir in the sugar, cook uncovered and stir occasionally. To check for doneness, I spoon out a little bit of jelly, let it cool for one minute and see if it holds its shape. I actually don’t like my jelly on the thick side, but rather only mildly thick. This way, I can also use it to accompany desserts such as cake or ice cream.

Canning: another significant rule I do not follow is the sterilization of the jars before filling them with the preserves. I just never found it necessary. I pour the preserves into clean jars as soon as I turn off the heat, while the preserves are still very hot, and I close the jars with the lid immediately. The heat creates pressure in the jar and seals it. I’ve had sealed jars of preserves in my pantry for months, and they turned out perfectly fine when they were eventually opened. This method is not scientifically proven, but it works for me. You are welcome to try it and let me know how it turned out.

Here are pics of my Italian plum preserves. This is probably one of my all time favorite preserves, and since the season for these plums is so short, I buy a large amount as soon as I spot them, and use them to make these amazing preserves which I store in the pantry, as well as a plum crostata that never lasts more than two days in my house.

Jachnoon

Breakfast as we know it, takes a different turn on Saturday, for traditional Jews. Shabbat breakfast is almost always food that was cooked overnight in the oven or on low heat on the stove. Or it was entirely cooked before Shabbat and warmed up in the oven that is on all day. Nothing is freshly cooked. Not that it matters much. Most Shabbat breakfasts I’m familiar with are so yummy and special, that it makes me look forward to Shabbat, just to be able to enjoy these dishes.

Jachnoon is of a Jewish Yemenite origin, and was brought to Israel by Yemenite immigrants. It is a baked rolled dough with honey and butter. Being so well integrated into Israeli homes, Jachnoon is now considered an Israeli dish.

Jachnoon pot is a simple tin pot with no handles and a tight lid that wraps around the top of the pot. In the U.S you may find it in some Israeli/kosher stores. However, any ovenproof pot with a lid, about 2.5 quarts in size, is good.

1kg (2 ¼lb) all-purpose white flour
120g (5oz) honey
4 tsp salt
3 cups water
½ cup oil
200g (8oz) very soft butter

In a mixer bowl, mix flour, honey, and salt, using a spoon. Add two cups water, give another stir with the spoon, then mix for about 3 minutes, using the hook attachment, to form a smooth, soft dough. The dough should not be firm, it should sag. If the dough is dry or stiff, add another ½ – 1 cup water.

Cover a large tray with oil. Divide the dough into 12 pieces by pulling dough the size of a small apple (with oiled hands) and pinching it off the large dough mass, one piece at a time. Knead each piece in your hands into a ball, then place it on the oiled tray after rolling the ball in the oil. You may need more than one tray to accommodate all the balls. Cover the dough with plastic wrap and let them rest for 30 minutes.

Jachnoun balls resting

Generously butter a work surface. Place one of the dough balls on the buttered surface. Use a rolling pin to roll out the dough, then keep spreading it outward using your hands, and open it to form a paper-thin, round shape. Using your hand, spread about one tablespoon very soft butter on the stretched dough.

Fold the right side of the dough to the middle, then fold the left side on top of the right one (like an envelope). Do not worry if you have some holes in the dough. You will end up with a long strip of folded dough. Butter the top of the strip.

Starting at the bottom, roll the strip of dough upwards while slightly pulling the edges outwards.

Place the rolled dough on the bottom of the pot adjacent to the wall. Repeat the process with the other balls and arrange them close to one another in one layer in the pot. When the first layer is full, cover it with parchment paper and create a second layer on top.

Optional: If you have room left in the pot after placing in all the rolls, you can add eggs. Wrap about 5-6 eggs in tinfoil. Cover the Jachnoon with parchment paper, then place the wrapped eggs on top. Cover the pot with the lid. No room left in the pot for the eggs? No worries. Place the tinfoil wrapped eggs on the oven wire next to the Jachnoon pot. Just make sure the eggs are well sealed in the tinfoil, to avoid steam from escaping.

Preheat oven to 220F. Place in the Jachnoon pot and the eggs in the oven before you go to bed and bake overnight (10-12 hours).

Jachnoun ready

Serve it the following day for brunch, with a nicely browned egg, grated fresh tomato salted, and spicy z’houg.

For the Jachnoon to taste best, eat it with your hands!!!

Jachnoun served