Gondi Nochodi

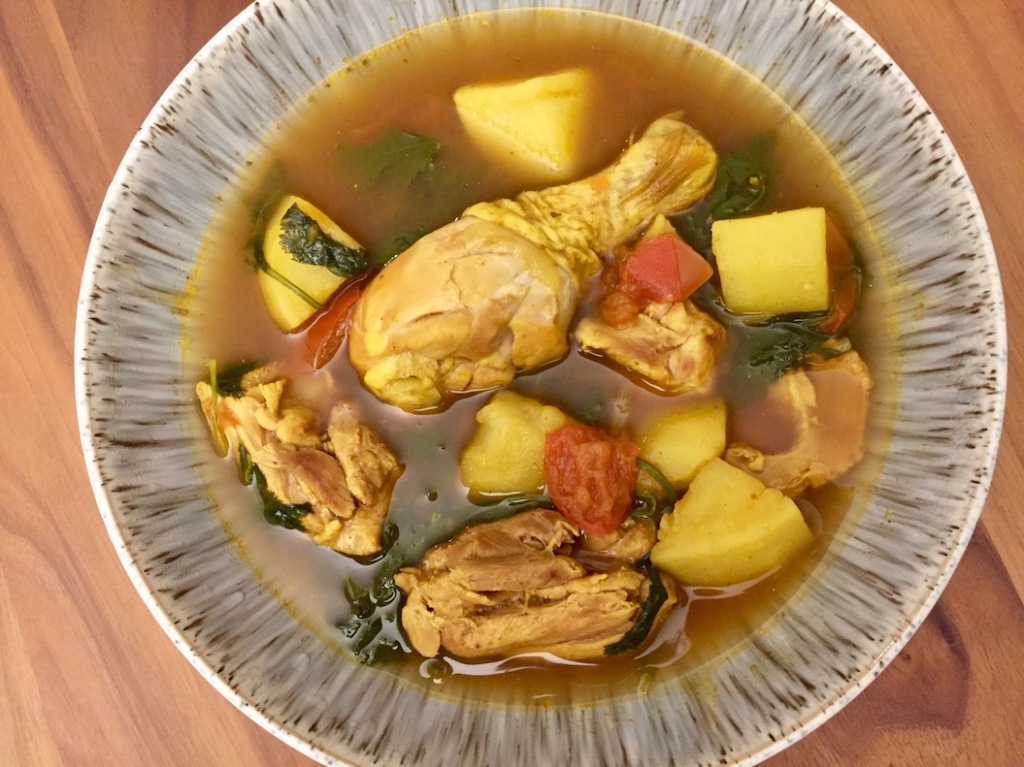
This recipe may look like Matzah ball soup, but it is actually a Jewish Persian dish, very popular among Persian Jews.  It is made of ground chicken and chickpeas.

Gondi, is perhaps the single most unique food to the Jews of Iran. While Persian Jews have over the centuries adopted the Persian cuisine in their kitchen (kosher style, of course), Gondi has been one of their few culinary innovations that they can claim as their own.

It is usually served as an appetizer together with Sabzi – raw green vegetables including tarragon, basil, mint, and radishes. In our home, we used to eat it as a main dish.

Ingredients:
5-6 oz roasted chickpea (found in Middle Eastern grocery stores)
1 lb ground chicken breast
2 large onions, shredded
1 tsp ground turmeric
1 tsp ground cardamom
1 tsp salt
½ tsp ground cumin
½ tsp black pepper
¼ cup canola oil or rendered chicken fat
4 tsp rose water (found in Middle Eastern grocery stores)
Homemade chicken soup (recipe follows) or 8 cups of good chicken stock
salt and pepper to taste

Preparation:
In a food processor, grind the roasted chickpeas only until they turn into crumbs. Be careful not to over grind it. You don’t want chickpea flour. You may find chickpea already coarsely ground in Middle Eastern grocery stores. Do not buy chickpea flour. It is too powdery.

Place the chickpea crumbs in a large bowl. Add all other ingredients except for the chicken soup, and mix well by hand, until mixture is well combined.

In a large saucepan, bring the chicken soup to a boil. If needed, add salt and pepper.

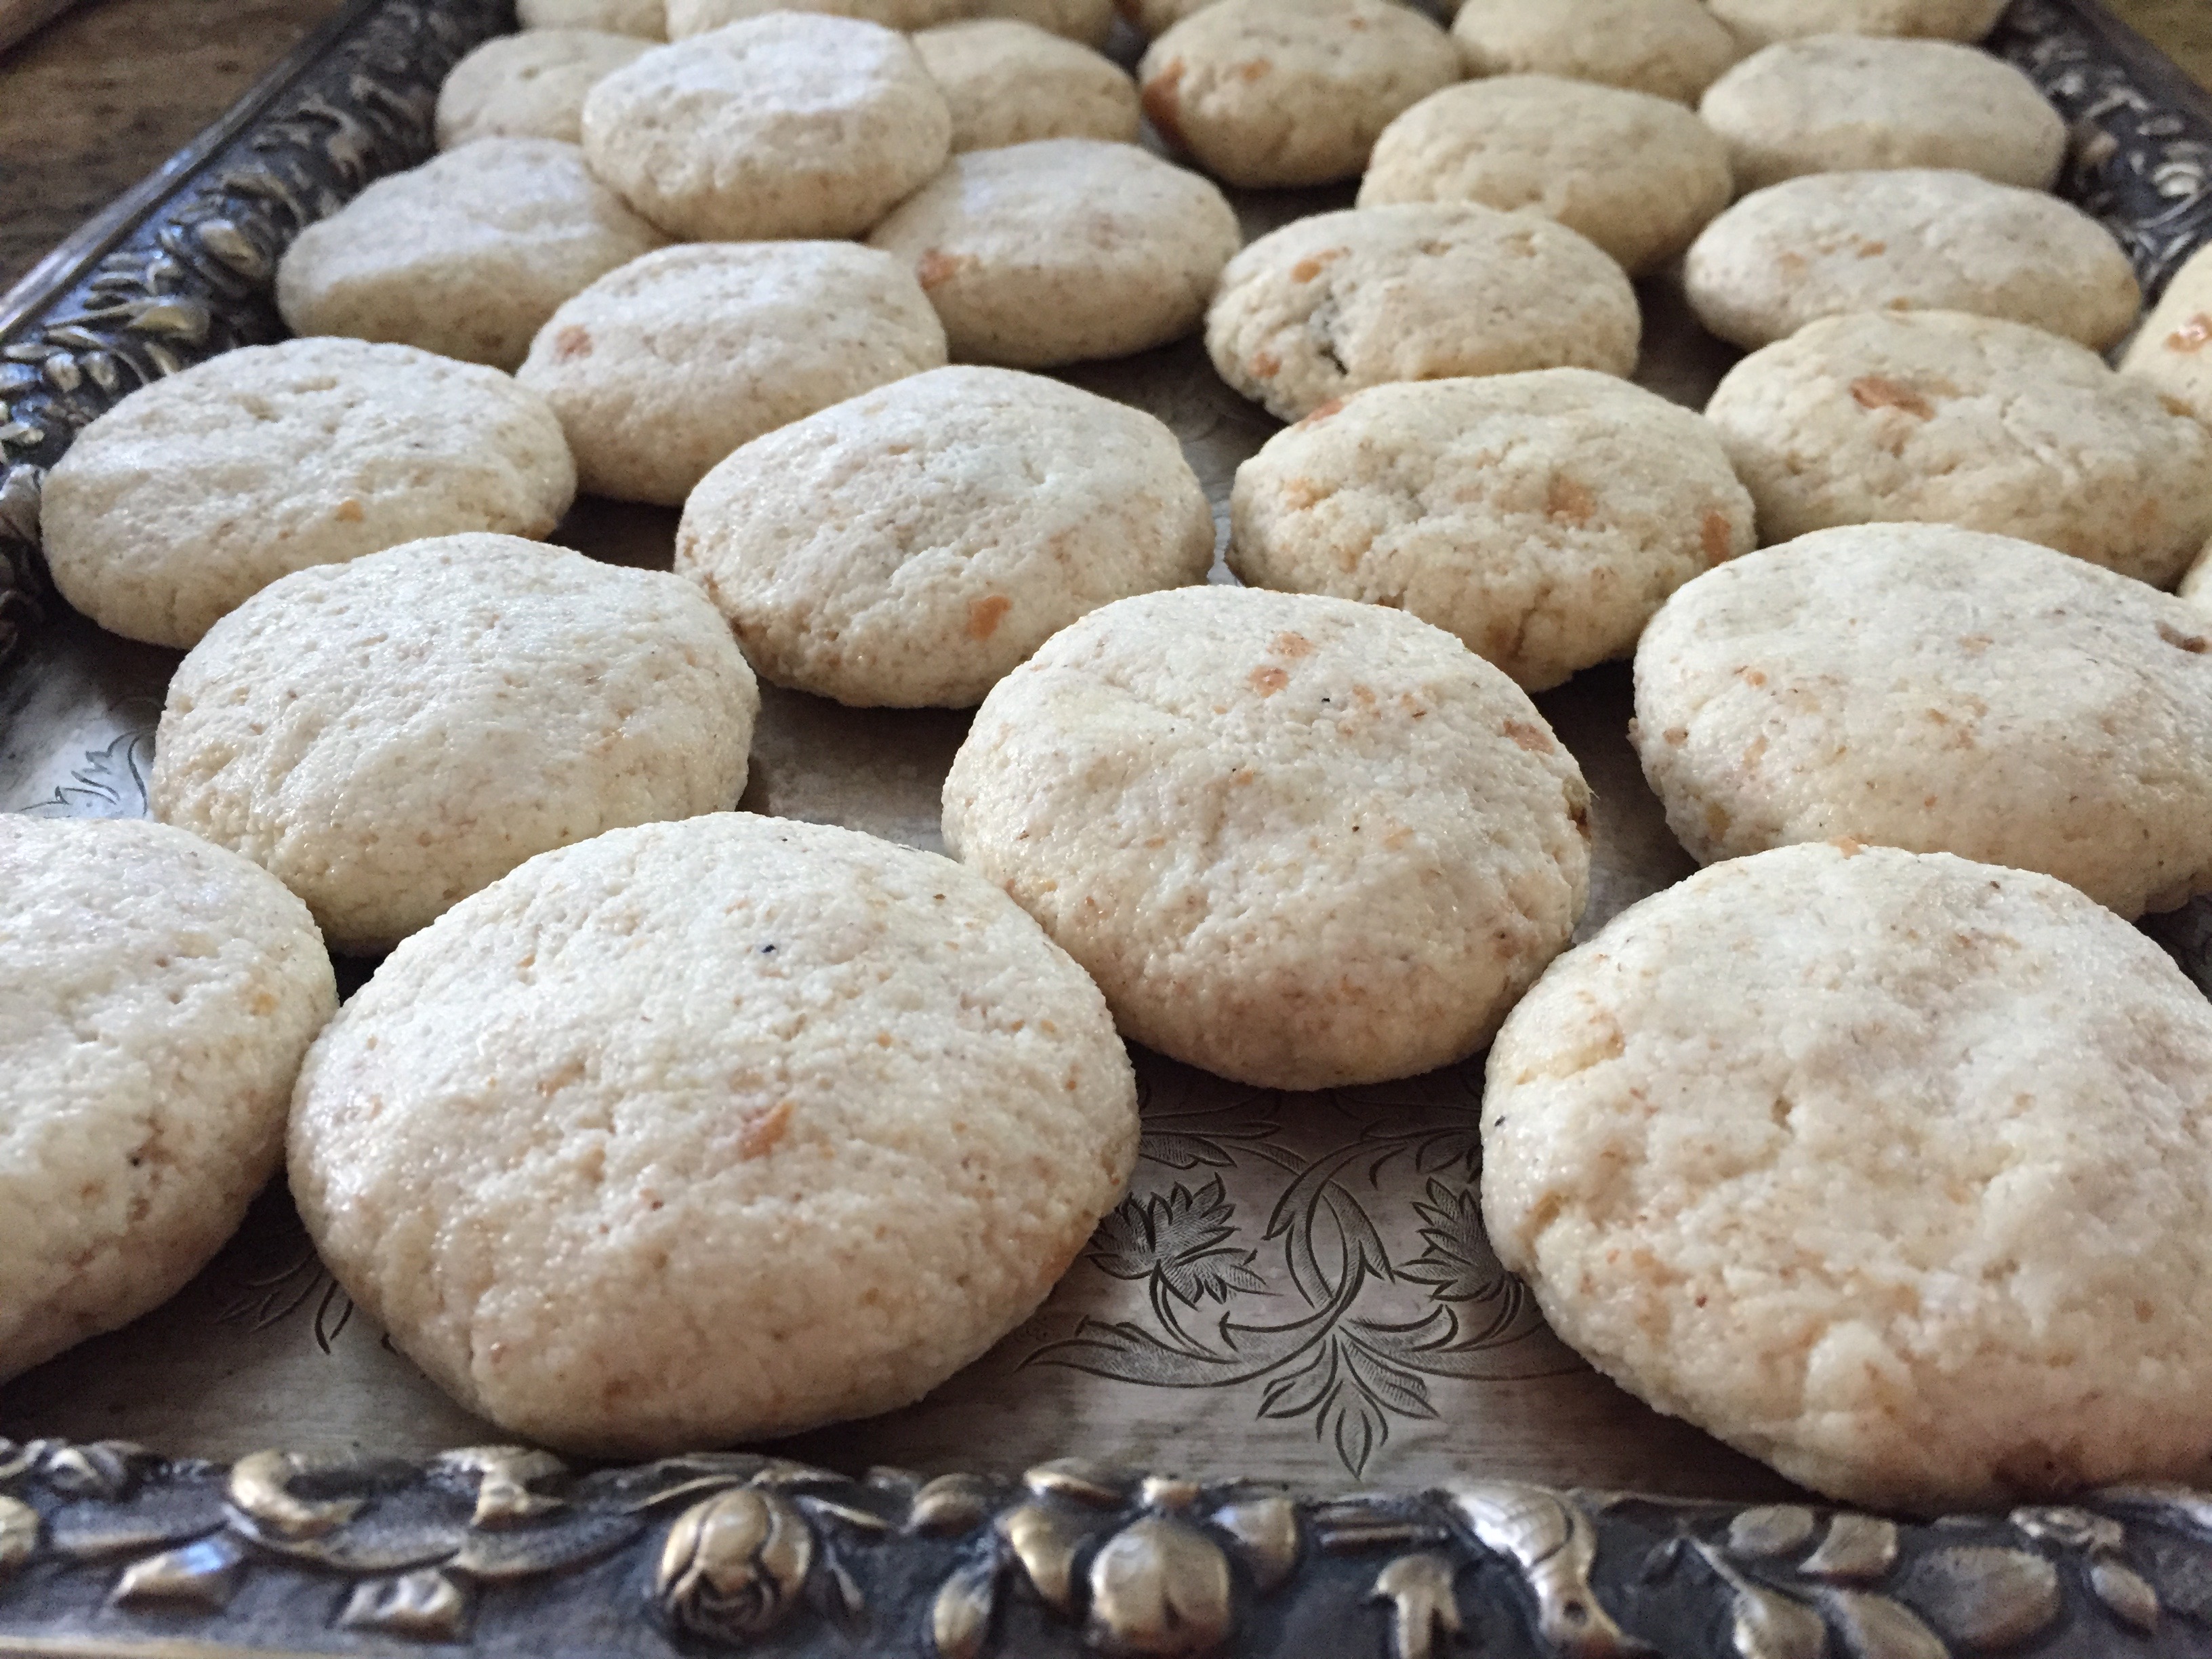
Make plum size balls of the chickpea mixture, and add them gently, one by one, to the soup. If the balls stick to your hands, use a small bowl with water to wet your hands lightly.

Lower the heat to medium and cook for about 30 minutes.

Place 1-2 balls in a soup bowl, add some soup and serve.

IMG_1158

Chicken soup

2 lb chicken bones (necks, backs) or other parts
8 cups water
1 large onion, quartered
1 small bunch cilantro
4 carrots, peeled and sliced into ¼ inch rings
1 tsp salt
½ tsp pepper
1 tsp turmeric
2 tbs chicken soup powder

Place the chicken in a large saucepan. Cover with 8 cups of water and bring to a boil. Using a large spoon, clean all the foam formed on the water.

Lower the heat to medium and add the onion, carrots, cilantro, and spices and cook for about an hour, covered.

Discard of the cilantro. You may use the soup as is to cook the Gondi dumplings in, or you may strain it, and have a clear broth for the Gondi.

Gondi is served with a plate of fresh green herbs such as basil, tarragon, mint, and sliced radishes.IMG_2324

Best Dill Pickles

I grew up with these pickles. My grandma made them and so did my mother. With the years I’ve tried other versions of pickled cucumbers, but always came back to this recipe.

A crucial thing to know before attempting to pickle cucumbers is that you MUST have the right kind of cucumbers. Otherwise the cukes become soft and mushy when pickled. You want them to remain crunchy. Which are the right cucumbers? In the U.S. the most used pickling cucumbers are the Pickalot and National Pickling types. They are short and have a bumpy skin, and they can be found in many supermarkets and markets.  

I like to use the Persian/ Lebanese cucumbers. These are actually cucumbers that where developed in Kibbutz Beit Alpha in Israel in the 1950s and made a name all over the Middle East. They are small in size, with a firm texture and their skin is smooth and thin. They are sweeter in flavor. I always called them Israeli cucumbers because these are the only cucumbers I knew when living in Israel. Nowadays they are making a name in the U.S. and I see them more and more in different supermarkets. These cucumbers are great for pickling, but they are also great eaten raw. At home, we use only this kind for all our uses – salads, tzatziki, pickles, or just eating them as a snack with some salt sprinkled on them.

Once you’ve got your hands on the right cucumbers, it’s time to pickle…

Ingredients:
2 quart pickling jar
2lb thin Israeli cucumbers, rinsed
10 sprigs dill, leafy parts only
6 large garlic cloves peeled and smashed
6 bay leaves
½ tsp red pepper flakes (optional)
3 cups warm water
½ cup white vinegar
4 hipping tsp salt

Preparation:
In a small pot, combine water, vinegar and salt , and mix until salt is dissolved.

Boil water in a large pot. When water is boiling, submerge the open jar and sterilize it for one minute. Remove the jar from the water using tongs, pour all the water out and leave to cool.

Place 5 sprigs of dill, 3 bay leaves, and 3 smashed garlic cloves on the bottom of the jar.

Insert the cucumbers and stand them tightly, one next to the other. If you have room on top insert more cucumbers in any way that works. I sometimes cut the cucumbers in half to fit them in.

When the jar is almost full (leave space of about 1 inch), top it with the rest of the dill, smashed garlic, and bay leaves, and sprinkle the pepper flakes.

Pour the brine into the jar to cover all cucumbers.

Tightly close the jar and let sit in room temperature, preferably in the sun.

The pickles will be ready to eat after 3 days. You can keep the jar refrigerated or at room temperature, but not in the sun.

Only use a clean, unused utensil to remove pickles out of the jar, and avoid touching any of the contents with your hands, to avoid spoilage.

Yemenite Chicken Soup

One of the most precious memories of my childhood is Shabbat at my grandparents’ home, in Tel Aviv. After spending the afternoon together, preparing for Shabbat, grandma lit the Shabbat candles and we prepared the table for Friday night dinner. Everything was very simple and modest. The dishes were simple dishes, and the table wasn’t dressed. But it felt very much like Shabbat. The Challah was covered with a special cover, and the Kiddush wine and cup were ready for grandpa to recite the blessing. Dinner was very modest too and included Yemenite chicken or beef soup that was meant to last for both Friday night dinner and Shabbat lunch, white rice, Hilbah (fenugreek), Zhoug and Challah.

For years, my mother used to make her own version of the Yemenite chicken soup for lunch on Fridays, a reminiscent from her parents’ home. Up until today, Yemenite soup is one of my favorite Friday night dinners, though we don’t make it often enough.

This recipe, which calls for chicken, is my grandmother’s version on this yummy soup. Or more accurately, my grandpa’s. After my grandparents got married, grandpa realized that grandma, who was not Yemenite, did not know how to cook Yemenite food, so he taught her what he knew. Grandpa made the soup sometimes with beef and sometimes with chicken.

Ingredients:
4 chicken thighs skin on
6 chicken drumsticks skin on
4 medium potatoes peeled and sliced into 1” slices
2 medium tomatoes diced
1 medium onion quartered
1 tbs tomato paste
2 heaping tbs Hawaij spice for soup (found online)
1 tbs chicken soup powder
salt and pepper
small bunch cilantro, washed and cleaned

Preparation:
In a large pot, place the chicken and cover in water. Bring to a boil. Discard of the water and rinse the chicken lightly to rid of the blood and protein foam which result from the boiling.

Put the chicken back in the pot, cover with water again and bring to a boil.

Lower the heat to medium and add the onion, potatoes, tomatoes, tomato paste, and the spices. Cook covered for about an hour. Add the cilantro at the end and turn off the heat.

If you rather make the soup with beef, use 2lb of beef shank meat cut into large pieces.

If you prefer the chicken version, you can use any part of the chicken, except for the breast.

All About Hamantaschen

Haman taschen (in Yiddish and German) means Haman’s pockets. These are traditional Jewish, triangular shaped cookies, made for the holiday of Purim. In a nutshell, Purim is the Jewish equivalent to Halloween when it comes to costumes and partying. Is has been celebrated for centuries to commemorate the almost annihilation of the Jews in Persia, 2000 years ago, and their last-minute redemption thanks to Queen Esther, who happened to be Jewish, and her uncle Mordechai. The villain in the story who wanted to get rid of all the Jews and ended up being hanged, is Haman, the king’s chief advisor.

So, the cookies are named after Haman’s pockets. Why? I have no idea. In Hebrew the name is even funnier and translates as Haman’s ears. Again, I have no idea how the name came to be, but it seems like no one really wonders about it. Weird!

I don’t think I’ve ever bought Hamantaschen. We’ve always made them at home, for Purim, ever since I was a little girl. I loved making them with my mother and I love making them every year with my kids. This year even my hubby joined the fun. I know they enjoy it too, even though they are not little anymore. It is a fun tradition that we have in our home, and it makes the Purim holiday even more fun and special. One of the nice customs of this holiday is to make baskets of foods and treats and give them to friends, neighbors, and the needy. So, we always make a huge amount of Hamantaschen and add them to the baskets we make.

If you live in in the U.S, in areas where there is a large Jewish community, you may have seen these triangular cookies in delis, bakeries, and diners all year round. But I can promise you that they don’t taste anywhere near the following recipe. If you ever had Hamantaschen and thought you liked them, you must try this version. You’ll never be able to eat the other stuff again. And if you never had Hamantaschen, don’t look any further. This is the real deal. The dough in this recipe is different than the usual cookie dough you’ll find in most recipes. It is delicate and melts in your mouth and is soooo delicious!!
Enjoy!!

Ingredients:
100g powdered sugar
200g (8oz) cold butter, cut into cubes
350g (2 ½ cups) flour
¼ tsp salt
2 egg yolks
¼ cup milk
1tsp vanilla extract or lemon zest from 2 lemons (depends on the filling)

Preparation:
Place the flour, sugar, butter, and salt in a food processor equipped with the blade attachment and work it to get a crumbly mixture.

Add the egg yolks, milk, and the lemon zest, or the vanilla, and keep mixing by pulsing the mixture only to the point where the dough becomes cohesive.

If the dough is too sticky, add one tablespoon of flour. If too dry and crumbly, add 1 tbs milk. Do not overwork the dough, as you want it to be flaky.

Flatten the dough into a 2-inch-thick disk, to make it easier to open it later on. Wrap the disk in plastic wrap and keep in the fridge for a couple of hours.

In the meantime, prepare the filling of your choice. Some suggestions are given on the bottom.

Preheat the oven to 350F. Remove the dough from the fridge and bring to room temperature so you can easily roll it out, without cracking the dough. Roll out the dough to 1/8 inch in thickness. Use a 3 ½ inch wide drinking glass or a round cookie cutter to cut round disks. Try to leave as little room as possible between disks, to avoid reusing much of the dough. The less you work the dough, the flakier the cookies will be.

Spoon 1-2 teaspoons of your filling of choice into the middle of each disk. Fold up the edges of the disk to form a triangle. Pinch the corners to “glue” them together. You may leave some the cookie open so the filling is visible, or you can choice to pinch the edges completely and create a “surprise” cookie.

Place the Hamantaschen, 2 inches apart, on a baking sheet covered with parchment paper, and bake for 12 minutes. The cookies should remain light colored. They are not supposed to brown too much.

There are some traditional Hamantaschen fillings used commercially such as prune, apricot or raspberry jelly, and sometimes poppy seeds. Chocolate filling is a newer addition in commercial Hamantaschen in Israel. However, the fillings are usually of the less good quality.

Best thing would be to make your own filling. You can fill your Hamantaschen with every filling you can think of. Here are some of our favorites:

Cocoa, chocolate Chips, and Cinnamon (use vanilla in the dough and omit the lemon zest)–
1 stick very soft butter
3 hipping tbs cocoa powder
1 hipping tbs cinnamon
5 heaping tbs sugar
1 cup chocolate chips
Mix the butter, cocoa powder, cinnamon, and sugar, into a paste. Place ½ tsp of the paste in the middle of each dough disc, then top with 4-5 chocolate chips.
You may also try to just fill the dough with some chocolate chips. It is less rich and gooey, but still yummy. Another option is to fill the Hamantaschen with Nutella. It is not my cup of tea, but my kids love it.

Poppy Seed, my number 1 choice (use lemon zest and vanilla in the dough)-
¼ cup milk
2 tbs honey
¾ cup sugar
2 cups ground poppy seeds
Zest from 2 lemons
Combine sugar, honey and milk in a medium sauce pan and simmer on low heat, until sugar is completely dissolved. Add the poppy seeds and keep simmering for 3-5 minutes, occasionally stirring the mixture. Remove from the heat, stir in the lemon zest, and set aside to cool.

Dates, pretty up there with the poppy seed (use lemon zest in the dough and omit the vanilla) –
200g (8oz) soft Madjool dates, pitted
50g (2oz) soft butter
Place dates and butter in a food processor and pulse into a paste.

Apricot preserves (use lemon zest and vanilla in the dough) – The difference between preserves and jelly is the texture. Jelly only has the fruit juice in it and is very smooth. Preserves have pieces of the actual fruit and are a little chunky. For our purpose, preserves are better since they hold better and are less runny when baked. Buy the best quality preserves you can put your hands on, do not compromise. It does make a difference. If you only find jelly, do not buy the fake one used in commercial Hamantaschen. Get the good stuff, with no additives or preservatives. To make it hold better when baked, mix the jelly with some tea biscuits crumbs.

Kubbeh Hamousta

Kubbeh hamousta (sour kubbeh in Kurdish) is one of the better known Kurdish classics. It was also one of my grandmother’s signature dishes. When she wanted to make sure we’d come visit, she would make kubbeh hamousta and call all her children to let them know. Not that we didn’t go see her anyway, but it was certainly a great pleasure to enjoy her kubbeh and see how happy it made her. Even when she got very old and could barely use her broken, aching hands, my grandma still insisted on making kubbeh hamousta for us. That was only one of her many ways to show her love to her six children, twenty-two grandchildren, and forty-four great grandchildren.

I had the privilege to spend many precious hours with my grandma, and learn from her the art that is Kurdish cuisine. The recipe below is my grandmother’s version for kubbeh hamousta. Although there are other versions out there, I wanted to remain true to her flavors and techniques. This way I feel I can pass on her legacy and continue my old world tradition.

Ingredients:
For the filling:
2 tbs vegetable oil
1 medium onion
1lb fatty meat (like chuck), cut into ½ inch cubes (I buy it pre-cut as Carne Picada)
Salt (to your liking)
½ tsp Black pepper
3 cloves garlic, minced
½ cup celery leaves, chopped very thinly

For the soup:
1 large onion, chopped
1 celery bunch with leaves, rinsed and cut into ½ inch strips
1 Swiss chard bunch (6-7 leaves), rinsed and cut into 1 inch strips
3 leeks
1 head garlic, cloves peeled and sliced
8 cups water
½ tsp. citric acid or juice from 2 lemons
2 heaping tbs. chicken soup powder
Salt
Black pepper

Preparation:
Heat 2 tablespoons of oil in a large sauté pan. Add the chopped onion and sauté until onion is translucent. Add the meat, salt, and pepper, and sauté over low heat, stirring occasionally, until the meat is crispy and well browned.

Remove the pan from the heat and add the celery and the garlic. Mix well and set aside to cool. The filling can be made in advance and kept in the refrigerator.

To make the soup, cut off the dark green part of the leeks and use only the white and light green parts. Cut the leeks lengthwise, then rinse under running water to remove all dirt and sand, inside and out. Slice the leeks into ½ inch strips.

In a large soup pot, heat the oil and sauté the onions.

Add the celery, Swiss chard, leeks, and garlic and sweat to extract the flavors of the veggies.

Add water and spices and bring to a boil. Lower the heat and simmer on medium low heat for about 30 minutes.

* Be very cautious when using citric acid. It is very strong and powerful when added to food. A tiny bit goes a long way, so be super careful with the quantities. The soup needs to be sour but in a pleasant way. You may want to adjust the amount of the citric acid to your liking.

While soup is simmering, make the Kubbeh dumplings following the picture step by step recipe in my blog.

Once done, you’ll have a tiny adjustment to make for the hamousta recipe. The shape of the kubbeh is slightly different. After you’ve created perfect balls, place each ball between the palms of your hands and slightly press to flatten it.

hamousta uncooked

Very gently, add the kubbeh dumplings to the soup, moving them gently occasionally, using a wooden spoon, to make room for more kubbeh dumplings to be added. Once you have all the kubbeh in the soup, cover the pot and simmer for 45 minutes.

Homemade Sauerkraut

Like any other fresh ingredient, cabbage that is left as is long enough, will start to rot, due to the bacteria that’s in it and that’s in the air. However, when pickled, the fermentation process that the cabbage goes through kills the bacteria that causes the cabbage to rot. And it creates an ideal environment for lactobacillus bacteria (also found in the cabbage) to flourish. Healthwise, that means that pickled cabbage (or any pickled veggie, for that matter) is rich in probiotics, naturally. Hence, it’s great for our health.

Another great by product of the fermentation is that it augments the amounts of the glutamic acid in the final product. Glutamic acid is an amino acid that is responsible for the umami flavor in foods.

Now that we understand the process let’s make it happen.

For a gallon size jar, you will need:

6.5lb shredded cabbage
3tbs koshering salt.

Place the shredded cabbage in a large bowl, sprinkle with the salt, and massage the cabbage to coat it well with salt. Let sit for 10-15 minutes. The cabbage wilts and extracts water, which is exactly what you want.

If you’d like to flavor your pickled cabbage, now would be the time. You may add chili pepper flakes, cumin seeds, caraway seeds, coriander seeds, fennel seeds – they all combine very well with pickled cabbage. I happen to like it ‘au naturel’.

Sterilize a one-gallon jar with boiling water. Do not shake the jar or it might break. Discard of the water and fill the jar with the salted cabbage. Make sure, while filling, that you press down the cabbage in the jar as much as possible, using your fist. Add the salted water extracted from the cabbage.

If the cabbage is not covered with water, that means that your cabbage was of the drier kind (like my cabbage), and you’ll need to add water. In this case, mix 1 quart of boiling water with 1 tbs salt, and set aside to cool. Once the water is at room temperature pour it into the jar, only to the point where it covers the cabbage.

Seal the jar, place it in a bowl or a tray with a rim, and keep in a cool place away from direct light.

The fermentation process of the cabbage creates a lot of gas in the jar and sometimes pushes out the liquid, which is why you want to keep the jar in another container for a couple of days. Also, to prevent the jar from exploding, you need to open it for one second, once a day, to let the built-up gas out. After 3-4 days you don’t need to worry about it anymore.

The cabbage takes 2 weeks to pickle but is at its best after 3-4 weeks. In my case, it took 3 weeks before the cabbage was good to eat. At 5 weeks it was even better and still had a crunch to it. And at 3 months it turned totally wilted and soft, and resembled the sauerkraut you buy at the store.

So be patient. It’s worth it! And when you end up with the best sauerkraut ever, I’d love to hear about it.