Vegan “Feta Cheese”

I was very skeptical about vegan cheeses that try to mimic real cheese. I’ve tried a few of them and wasn’t at all impressed, to the point where I decided it wasn’t worth the effort looking for substitutes. I just needed to learn to live without cheese. It was all good until I came across this “feta cheese” recipe in an Israeli vegan blog. Feta cheese was one the things I most regretted not eating anymore since becoming vegan. I LOVE feta cheese. So when I came across this recipe I had to give it a try. And I was pleasantly surprised. It is delicious!! Is it feta cheese? No. But it tastes and feels like cheese and it is salty and tangy enough to satisfy my craving for feta cheese.

So without further ado, here is the recipe. If you are a vegan who happens to love feta cheese, this may hit the spot.

Ingredients:
1 ½ cups (145g) almond flour
45g raw cashew nuts soaked in water for 5 hours
¼ cup lemon juice
½ cup water
3 tbs extra virgin olive oil
2 cloves garlic
1 ¼ tsp salt

Preparation:
Place all the ingredients in a food processor and process to a smooth puree.

Place a colander in a slightly bigger bowl and drape a cheese cloth over the colander. Pour the puree into the cheese cloth. Tie the corners of the cheese cloth together to make a sack, and suspend over a bowl for 12 hours or overnight in the fridge.

Preheat an oven to 350F.
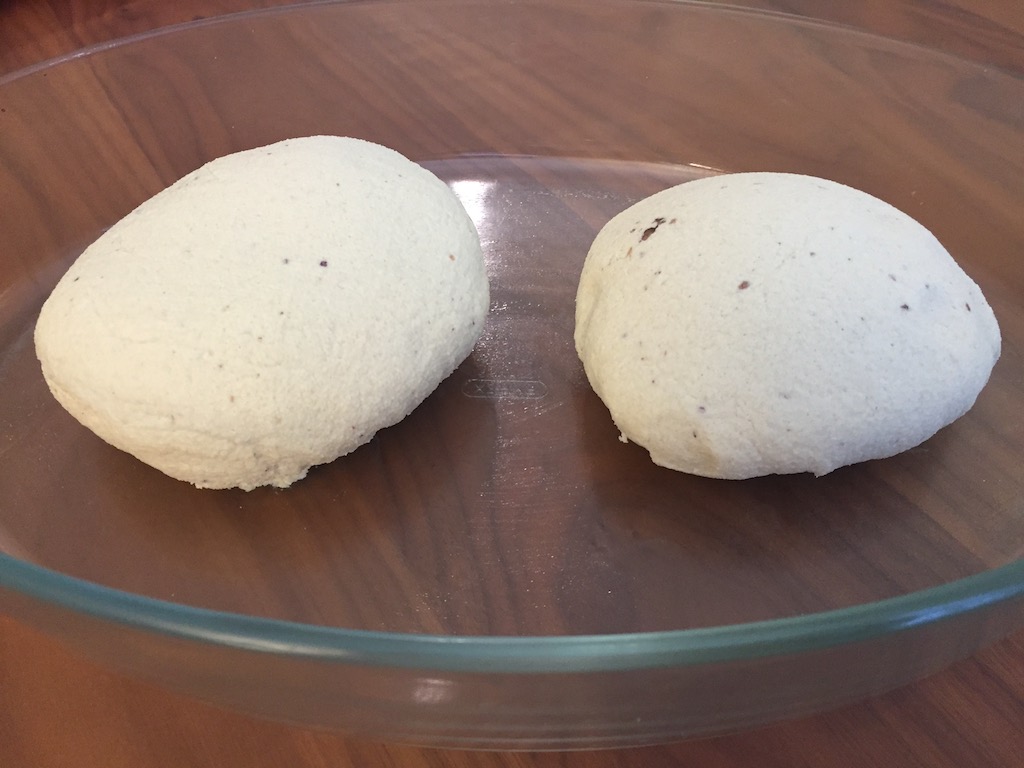
Grease a baking dish with a tiny bit of oil, then untie the cheese cloth and gently place the ball of cheese in the baking dish, face down.

Bake for about 40 minutes, until the cheese becomes golden. Remove from the oven and let cool completely.

Keep refrigerated up to 3 weeks, if it lasts that long…

We like to use it as a spread or crumble it over a salad or any other dish.

It is really surprisingly delicious!

Cabbage Puff Pastry Roulade

An easy and fun appetizer for a festive meal, that can also serve as a main dish with some salad on the side. This year this appetizer will be part of our Rosh HaShanah table. Rosh HaShanah is the Jewish new year and usually we celebrate it with different edible blessings. One of the main blessings is for us to be the head and not the tail or in other words we are wishing to be leaders and lead by example. The food which symbolizes this blessing is the head of a cow or lamb (cheek meat) and in some communities it is the head of a fish. This year, though, as we turned vegan, we can’t do either, so we decided to be creative and use a head of cabbage. Hence the following recipe. For more about Rosh HaShanah recipes check my Rosh HaShanah Blessings and Recipes.

Wishing a happy, healthy, and prosperous new year to all who celebrate!

Ingredients:
1 large onion, thinly sliced
4 tbs oil
½ cabbage head, thinly shredded
12 mushrooms, sliced
1 tsp mustard powder
1 tsp paprika
¼ tsp cayenne pepper
Salt and pepper to taste
1 package frozen Puff Pastry sheets (2 sheets)
Sesame/nigella seeds (optional)

Preparation:
In a large saucepan heat the oil and sauté the onion until translucent. Add the cabbage and keep sautéing, while stirring occasionally, until cabbage is wilted and slightly seared.

Add the mushrooms and the spices and give the dish a good stir.

Reduce the heat to medium-low and cook for about 15-20 minutes, covered, until the cabbage and mushrooms are very soft, and all the liquid evaporated from the pot. If there are liquids left, remove the cover and raise the heat to let all liquid evaporate.

Remove from the heat and set aside.

Defrost the frozen puff pastry at room temperature for about 40 minutes. The dough should be defrosted but cold enough to handle, otherwise it’s too hard to work with.

Preheat oven to 400F.

Place one of the pastry sheets on a work surface and roll it out to a rectangle. Place ½ of the chilled cabbage filling in the middle of the sheet lengthwise, to create a cylinder. Fold the short side edges of the dough on top of the filling, then fold the top and the bottom edges, one on top of the other, to close the roulade.

Place the roulade, sim down, on a baking sheet covered with parchment paper and repeat the process with remaining ingredients.

You may brush the top of the roulades with egg wash and sprinkle sesame or nigella seeds on top.

Bake in the preheated oven until the roulades turn golden brown. Remove from the oven and chill for a few minutes before serving.

My Sister’s Amazing Sandwich Rolls

My sister is a pastry chef, and she is REALLY great at baking. Everything she bakes is amazingly good. She happens to be a wonderful cook as well. Today I’m posting her recipe for Israeli sandwich rolls. These rolls are the kind we used to buy every morning at the grocery store when we were kids in Israel and made sandwiches to take to school. Soft and slightly chewy, and always so fresh…I’m not sure if you can find these rolls in the U.S. I haven’t seen any in all the years I’ve been living here.

Ingredients:
1 kg (2 lb) all-purpose flour
2 tbs dry active yeast or 50g baker’s yeast
5 tbs sugar
1/3 cup oil
2 cups lukewarm water
1 tbs salt
1 egg for egg wash (optional)

Preparation:
In a mixer bowl equipped with the hook attachment mix the flour, sugar and dry yeast.

If using baker’s yeast, dissolve the yeast in ½ cup of lukewarm water. Let it develop for 5 minutes. Add it with the liquid in the next stage.

While the motor is running, gradually add 2 cups water (or 1 ½ water and the yeast mixture if you used ½ cup water for the yeast) and oil. Add the salt at the end and continue kneading for 7-10 minutes, until the dough detaches from the walls of the mixing bowl, but still sticks to the bottom.

Place the dough in a lightly greased bowl, cover with a clean towel, and proof in a warm place until it doubles in volume.

Preheat oven to 350F.

Remove the dough from the bowl and place on a work surface lightly floured.

Punch the dough a few times to deflate it and divide it into 16 equal pieces.

Roll each piece of dough into a 10-inch-long rope and tie it in a knot.

Place knots on a baking sheet covered with baking paper and space them out, leaving 4 inches between knots. Cover with a towel and proof again until knots double their size.

Bake in a 350F oven for 20 minutes.

Textured Soy Protein (TSP)

Textured soy protein (TSP) is a by-product obtained from extracting soybean oil. The pulp is separated from the oil and is extruded in the form of dehydrated chunks of fiber with a spongy texture that slightly resembles meat texture. TSP is made of soybeans but it may also contain wheat and gluten. It contains 50% protein in its dry form, and 16% protein after rehydrated, and is therefore considered a great substitute for meat.

Textured soy protein can be found in the shape of nuggets, flat strips, or flakes. Its flavor is pretty bland. Given that its texture is dry and spongy, it can absorb a lot of liquid and take on the flavors added to it, so it can imitate beef, chicken, pork, fish, or any other flavor you wish to add to it.IMG_7794

The recipe below is a pretty successful attempt to substitute soy nuggets for beef. My traditional recipe for beef croquettes calls for ground beef, but since we have become vegan in my family, I decided to recreate the recipe with non-animal products. Soy nuggets seemed like the best way to go.  They can be found in Asian and Indian grocery stores, and in health food stores.

To prepare it for use, TSP should be rehydrated. It needs to be soaked in hot liquid (water, soup) for about 30 minutes, then drained, and all liquid should be squeezed out of it. Then it is ready to be used in a dish. For the following recipe, I soaked my soy nuggets in boiling water.IMG_7724


Soy Croquettes

Ingredients:
2 cups dry soy nuggets
2 tbs ground flax seeds
8 tbs water
1 cup parsley leaves
1 medium onion, peeled and quartered
3 cloves garlic, peeled
4 tbs all-purpose flour
2 tbs chicken flavored soup powder
Salt and pepper
Oil for frying

Preparation:
After soaking, draining and squeezing all liquid out of the soy nuggets, place them in a food processor and pulse to create crumbs resembling ground meat. Move to a large bowl.IMG_7725

In a small bowl mix the ground flax seeds with the water and let rest for a couple of minutes, until it becomes eggy in texture. Or, if you eat eggs, you may lightly beat 2 eggs.

Place the onion, garlic and parsley in the food processor and chop thinly.IMG_7726

Transfer to the bowl and add the flour, the spices, and the flax seeds (or the beaten eggs).

Using your hands, mix all the ingredients to a cohesive mixture.

Form croquettes the size of a ping pong ball and flatten them a little.IMG_7730

Heat oil in a large skillet and fry the croquettes for 3-4 minutes on each side, until golden brown.

IMG_7757

I tried adding the fried croquettes to a Persian stew that I made (something I used to do with beef croquettes). The stew came out delicious, but the croquettes fell apart. So I think it’s better to just eat them fried with some other things on the side.

Enjoy!

IMG_7758

Best Dill Pickles

I grew up with these pickles. My grandma made them and so did my mother. With the years I’ve tried other versions of pickled cucumbers, but always came back to this recipe.

A crucial thing to know before attempting to pickle cucumbers is that you MUST have the right kind of cucumbers. Otherwise the cukes become soft and mushy when pickled. You want them to remain crunchy. Which are the right cucumbers? In the U.S. the most used pickling cucumbers are the Pickalot and National Pickling types. They are short and have a bumpy skin, and they can be found in many supermarkets and markets.  

I like to use the Persian/ Lebanese cucumbers. These are actually cucumbers that where developed in Kibbutz Beit Alpha in Israel in the 1950s and made a name all over the Middle East. They are small in size, with a firm texture and their skin is smooth and thin. They are sweeter in flavor. I always called them Israeli cucumbers because these are the only cucumbers I knew when living in Israel. Nowadays they are making a name in the U.S. and I see them more and more in different supermarkets. These cucumbers are great for pickling, but they are also great eaten raw. At home, we use only this kind for all our uses – salads, tzatziki, pickles, or just eating them as a snack with some salt sprinkled on them.

Once you’ve got your hands on the right cucumbers, it’s time to pickle…

Ingredients:
2 quart pickling jar
2lb thin Israeli cucumbers, rinsed
10 sprigs dill, leafy parts only
6 large garlic cloves peeled and smashed
6 bay leaves
½ tsp red pepper flakes (optional)
3 cups warm water
½ cup white vinegar
4 hipping tsp salt

Preparation:
In a small pot, combine water, vinegar and salt , and mix until salt is dissolved.

Boil water in a large pot. When water is boiling, submerge the open jar and sterilize it for one minute. Remove the jar from the water using tongs, pour all the water out and leave to cool.

Place 5 sprigs of dill, 3 bay leaves, and 3 smashed garlic cloves on the bottom of the jar.

Insert the cucumbers and stand them tightly, one next to the other. If you have room on top insert more cucumbers in any way that works. I sometimes cut the cucumbers in half to fit them in.

When the jar is almost full (leave space of about 1 inch), top it with the rest of the dill, smashed garlic, and bay leaves, and sprinkle the pepper flakes.

Pour the brine into the jar to cover all cucumbers.

Tightly close the jar and let sit in room temperature, preferably in the sun.

The pickles will be ready to eat after 3 days. You can keep the jar refrigerated or at room temperature, but not in the sun.

Only use a clean, unused utensil to remove pickles out of the jar, and avoid touching any of the contents with your hands, to avoid spoilage.

Turkish Salad

In Israel, this salad is known as Turkish salad and is sold in every supermarket under this name. I’m not sure that this salad actually originated in Turkey, since I haven’t found any supporting evidence for it when looking for recipes. However, I don’t know what else to call it, so I’ll just go with the name I know.

We make many different salads at home on a regular basis but Turkish salad wasn’t one of them. For no good reason, really. But we did eat it every time we dined in Middle Eastern grill restaurants in Israel. And my kids loved it. So I decided to look for the recipe and make it at home. As I’m sure you know, as with any recipe, there are so many different versions and I wasn’t sure which one to try. And then I met this Israeli woman who owns a bakery/grocery store in Boca Raton, where I buy really good pita bread. She also makes her own salads, one of them was this Turkish salad. When I asked her how she makes it, she gave me the recipe without hesitation, which I thought was very nice of her. And this is the recipe I use. It tasted pretty good to us, so we stuck with it. It is a salsa-like salad, and is a great accompaniment to main dishes or on sandwiches. We especially enjoy it with good pita bread or a fresh homemade challah. Hope you like it, too.

Ingredients:
4 tbs oil
3 red bell peppers, diced
2 cloves garlic, minced
1 can tomato paste
½ cup water
1 tsp cumin
½ tsp sweet paprika
½ tsp salt
½ tsp sugar
1 medium onion, diced
1 cup thinly chopped cilantro
½ cup thinly chopped parsley

Preparation:
In a medium saucepan, heat the oil and sauté the peppers for 3 minutes on medium high heat.

Add the garlic and keep sautéing for 2 more minutes.

Add the tomato paste, mix it in well and cook for 1 minute contently stirring it so that it doesn’t burn.

Add the water and the spices, lower the heat to medium and cook for 10 minutes.

Add the onion, cook for 2 more minute, then remove the pot from the heat.

Add the cilantro and parsley and mix well.